

Erin enjoys attending various Home and Garden shows when she isn't spending time writing. She loves finding new ideas and inspiration to bring to her own outdoor spaces and share with you!
- Best Porch Fireplace Ideas - August 29, 2022
- How to Build a Patio Guide in 5 Steps - August 29, 2022
- Farmhouse Fall Porch Decor Guide - August 27, 2022
One of my life-changing experiences has been volunteering with Habitat for Humanity. While it’s been a while, just seeing a home built from the foundation is a one-of-a-kind experience.
That’s especially true when you meet a family whose home has been destroyed or lost due to hardships, and one of the most beautiful additions to those homes was a simple one many of us take for granted: a patio slab built from scratch.
How to build a patio is not common knowledge- and the task certainly isn’t simple. Even the smallest patios require careful planning, an estimate of costs and materials, and considerations to ensure they will not sag.
Here’s your guide on how to build a patio – and additions like steps and a railing. From foundation to landing to joists, these steps will make your DIY patio extension easier, step by step.
Bottom Line Up Front Summary
Building a patio is no easy task- but it’s also one of the best upgrades you can make. Even a small and simple patio could form the foundation for a small seating area.
Luxurious patio es can include fabulous additions like pergolas, gazebos, and outdoor fireplaces. The important thing is to start with a blueprint plan and budget, gather the materials needed, and work methodically step by step.
Step One: Making Plans/ BluePrints
 No patio is going to turn out well without plans. I admit: that plans are important to me in my daily life. I’m a natural planner, you could say. But regardless of where you fall on that spectrum, making plans for your budget and the scope of your project is important.
Dimensions
The standard size for a patio is roughly 16 by 16 feet. But if you want room for entertaining, I recommend increasing that to at least 25 feet wide or larger. Another rule of thumb is to make sure that your patio is wide enough to accommodate your front or back door- with a little clearance preferably on both sides.
Cost Estimator
The best way to estimate costs is to calculate what materials you’ll use and how much, of course, you need. But you also have to factor in other costs, such as your tools and, of course, if you have something professionally installed. Get a quote or Try an Online Cost Estimator.
Other Considerations
Additions, like patio steps and railings (covered below), will add to the total cost of your patio. They will also add to the time and labor required, so make sure you plan.
Step Two: Gathering Patio Materials
Step two of this multistep process is to gather all the materials you’ll need. Once you’ve made your plans, you’ll want to have everything together to get started. I’m guilty of starting a home improvement project- only to realize I don’t have everything I need. Since building a patio is a painstaking process, being as prepared as possible is your best bet for things running smoothly.
Main Patio Material
What should you use for your patio? The truth is there isn’t one best material- but each comes with its pros and cons. Here’s what you need to consider:
| Main Patio Materials | Pros | Cons |
| Composite/ Engineered Wood |
|
|
| Concrete |
|
|
| Stone/Pavers |
|
|
Wood is used for decks, so I won’t discuss the pros and cons here. For most people, concrete is the best option. If you want to DIY, concrete is easy to pour and doesn’t require as much precision. I would opt for professional installation if I’m paying for more expensive patio material, like stone, pavers, or engineered wood/ composite materials.
Other Materials:
Assuming you’re opting for a concrete patio, you’ll also need gravel or sand, wire mesh, lag screws, joist hangers, 2 by 4’s (plywood/ can cut), nails, sealant, and optional materials for paint and railing. Likewise, you’ll want to look at patio columns that fit the style you’re going for.
Equipment and Tools
The list is long- and what you need exactly depends on your plans. But all of these tools are good to have on hand. Don’t have everything you need? You can rent tools for home improvement stores:
- Miter Saw
- Orbit Saw
- Post Digger Or Auger
- Drill
- Bubble Level
- Drivers, Bits
- Shovel
- Box Cutter
- Hammer
- Measuring Tape
- Tarp
- Rubber Mallet
Safety Gear
This is a step too many people skip- but please don’t! Safety first is not just a catchline but something really important:
- Protective Goggles
- Waterproof & Alkali Resistant Gloves
- Long Sleeves
- Long Pants
- Waterproof Safety Boots
Make sure your area is free of obstructions and that you don’t have any young children or pets nearby.
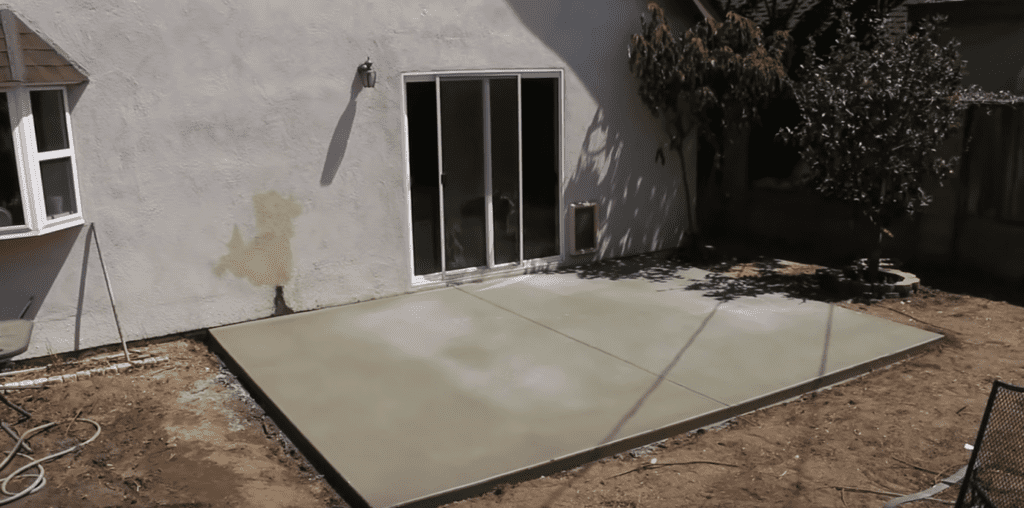
Three: Building A Simple patio (Step by Step)
This plan is for a basic concrete patio. Use it as a template and customize it as you wish. If you follow this step by step, it’ll get you on the right track for most patio es. Make sure you avoid Common Concrete Pouring Mistakes.
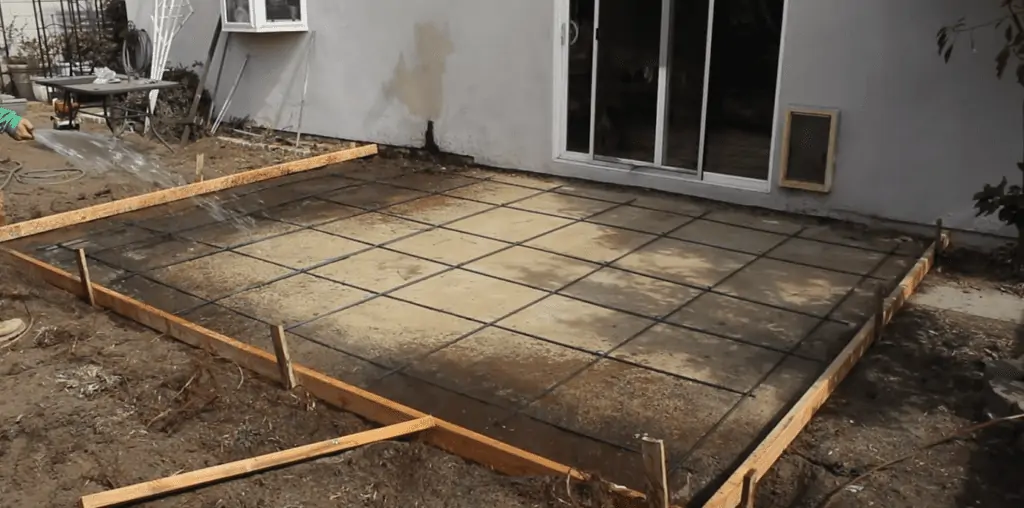
- Lay Out Temporary Frames. Batter boards are used to map out where your patio will be. Dig into your soil at your desired depth. I’d aim for no less than 6 feet deep and no less than 10 or 12 feet deep if I lay to add furniture. Remove any debris and cover it with gravel. Watch For Framework Techniques.
- Place stakes. Place wooden pegs on the edges of your layout, sloping your patio to the home. The slant should be roughly ¼ to ⅛ inch.
- Nailing Down Boards. Using 2 by 4’s (foam boards), nail wooden planks and attach them to your evenly spaced stakes.
- Splicing Boards Together. Use ¼ to ½ inch plywood to form a joint for any boards that exceed the length you need. Include a joint to connect directly to your house. The joint adds stability to your patio design. Watch For How to Build Concrete Forms.
- Apply Release Agent. Add a lubricant to your boards to keep them separated and from adhering during the next steps.
- Use Wire Mesh to Add Support. Your mesh should sit on top of your layout and be tightly secured.
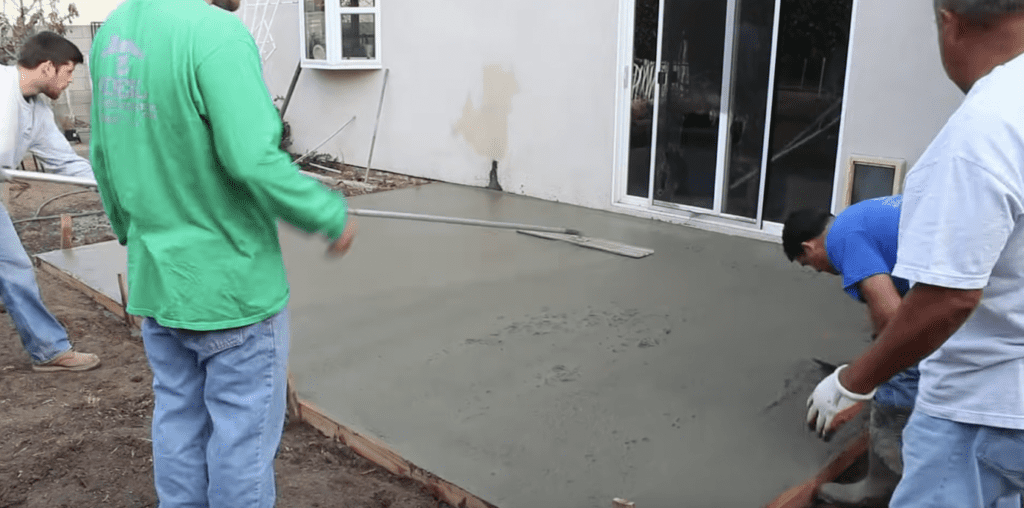
- Pour Concrete. Pour and smooth concrete in patches, working quickly with a shovel. Remove any access. Use a bubble level or similar device to even everything out.
- Cut control joints, as needed, with an orbit saw (after cement dries)
- Use a broom or Bristle to smooth your patio as it dries.
- Lay Plastic Tarp and allow your patio to dry for at least 2 days.
Feeling lost? Get the basics down first with a Guide on How to Pour a Concrete Slab. The key is to work at a consistent pace. Concrete dries in 24 to 48 hours, so it; ‘s best to ensure you can finish something in a day. To avoid lumpy concrete, make sure you remove any debris before you start and benign with as level of ground as possible.
Four: Patio Additions
Now that you have your patio laid out, other additions must be considered. Some of these can be added on after- like an above-ground pool and a seating area. However, it makes more sense to incorporate steps and railing into your original blueprints.
Steps and Railing
Steps and railing are a great addition to a patio – making it more accessible and safer to use, especially on a slope. Pouring concrete patio steps requires starting with a simple wooden stairs framework, then carefully pouring concrete inside.
A chute is the easiest way to distribute the concrete, and you’ll want more than one person to ensure you’re constantly smoothing the concrete into the mold formation. This DIY Tutorial is about as simple as it gets.
The railing is simpler. You can buy handrails systems that fit a few steep grades. These require a ⅜ drill bit and give you that extra support. It’s worth the extra $200 or so for those slippery days or anyone needing that extra support. I also find rails aesthetically pleasing.
Above Ground Pool
Have a large patio? Above ground, pools are great for entertaining and a stunning addition. Minimalist pools are in-, and an above-ground pool is cheaper and more feasible for a patio. Above ground, pools should be professionally installed and look best when surrounded by landscaping and an area for lounging.
Pergola/ Gazebos
Pergolas and gazebos are a great solution if you don’t want a covered or screen patio but want more privacy and comfort. A pergola allows the sun to stream through, while a gazebo gives you more coverage. But, pergolas are also more affordable and better suited for a DIY project. Learn how to make a pergola or shop for both pergolas and gazebos on Wayfair, Home Depot, Menards, and other stores.
Seating Area
Patio furniture is a great way to make the space more your own. If you want a classic look, it’s hard to go wrong with either a front swing or rocking chairs. I love Polywood for its weather durability, low maintenance, and beautiful aesthetic. A modern patio looks fantastic with powder-coated steel or stainless steel chairs. Here’s Where (And How) to Buy Outdoor Furniture Online.
Step Five: Patio Maintenance
You’ve finished your simple patio, and now it’s time to enjoy it for years to come- or is it? Luckily, concrete patios don’t require much maintenance compared to, for example, wooden decks.
But inspecting your patio once a year- especially after freezing temperatures- is a wise choice. Over time, freezing temperatures and natural air exposure will cause cracks. The key is to catch those cracks early on. If you do, they can easily be fixed with concrete crack sealant.
Other steps you can take:
- Use a power washer to keep it clean. I love using a power washer for Spring cleaning- and it can do wonders. Renting a power washer from a home improvement company is one option, or you can buy one for a few hundred dollars.
- Using vinegar with baking soda works for small spills and stains!
- Seal patio es Every 1-3 Years. This step will save you money in the long run, and it’s not too expensive or difficult to do.
- Go Easy on Chemicals. Harsh chemicals will reduce the longevity of your patio. But one mistake I’ve made is using too much salt during the Winter. Use as little as possible- especially in the first year or two.
Frequently Asked Questions
Answer: Building a patio yourself can save you a lot of money- because you’re cutting out labor and professional installation costs. (Average labor costs are about $9.50 to $10 per square foot). A DIY patio costs an average of $5,000 to $10,000 – that’s still an investment. The more complex the design and the more additions, the more expensive.
To save even more money, add a patio to as level of an area as possible and buy less expensive materials outside of peak months (Winter is a great time to buy and stock up on your materials). And, of course, having a solid blueprint for your patio is also wise.
Answer: Building a patio isn’t easy: a deck is more challenging between a deck and a patio. That’s because it’s a multistep process requiring much planning and precision.
A simple patio on level ground is not too challenging for someone who’s experienced in home improvement/ DIY projects. If you’re not confident, sometimes it’s worth it to pay for professional installation. Luckily, there are many guides and tutorials available.
Answer: Working with professionals for an addition to your home (or a new home)? You should contact an architect before a builder. The architect makes blueprints and creates a vision for home designs.
On the other hand, builders oversee the process and offer custom homes. You don’t always need both a builder and an architect. Architects are useful if you’re unsure about your visions and aren’t fond of a builder’s premade plans.
Answer: The challenge of having a wooden patio or deck (and posts) is that it can rot over time. The best way to prevent this in the first place is to opt for a kiln-dried post- which removes much of the problematic moisture. Treating it occasionally oil is another way to prevent rotting and warping. You can also waterproof near the foot of your post.
This is a great step because water can fill near the base- which is a common reason for serious structural problems. Home improvement stores have affordable caulking and sealants that can also be used around cracks. You can keep your patio and patio posts in good condition with care and attention for many years. These preventative steps are important if you want to reduce long-term costs.
Final Thoughts
Building a patio is both a challenging and rewarding task. It’s not just about the curb appeal or potential added value to your home. For me, it’s all about extending your outdoor space and having a place to sit with a great book or loved ones.
Tiny patios and grand patios alike, building one yourself not only cuts costs but brings the pride and personal satisfaction of a job well done. Of course, a simple design is the best way to go if you’re unsure about building a patio. And if you still don’t think it’s the best idea for you after reading through these steps, you can find a reputable patio contractor near you.
Final Recommendations: Find a Contractor Near You
Still not feeling the DIY route? Here are some ways to find the best professional for your home. Some referral services, like Angi, have had complaints filed against them. A better way is to Google “patio contractors near me.” Look at the Google reviews and check on their Better Business Bureau profile. Next, ask if they will offer a free quote and ask for it to be cost-inclusive (both materials and labor).
Another option is home improvement stores. Home Depot Home Services and Lowes Exterior Installation are two options.
Recommended Reads: